
Kenvara
Getting started
Start the evaluation, work through the Set-up checklist on one service project, write and publish the first known error, and check what customers will see.
Before you start
Kenvara is one app, paid through Atlassian, with Atlassian’s 30-day evaluation. Every feature is in it while its licence is active, and the evaluation counts as active.
You need Jira administration on the site to install it and to start the evaluation, and project administration on the service project you are setting up. Everything is off after install: no service project uses Kenvara, and nothing on the customer portal changes until you turn a portal surface on.
Start the evaluation
A site administrator installs Kenvara from its listing on the Atlassian Marketplace and starts the evaluation, or subscribes. Atlassian can take a few minutes to report a new evaluation. The first time anyone on the site turns on “Use Kenvara on this service project” and saves, that save checks the licence itself, so if it is refused, wait a few minutes and save again.
Kenvara’s own page for the whole site, called the Kenvara page in Apps administration in these guides, is not listed in the Apps administration sidebar. Atlassian has moved app management to Atlassian Administration: open Connected apps there (Jira’s Manage apps page links to it), select the … menu beside Kenvara and choose Configure. The sidebar lists only “Kenvara export and import”.
Set up a service project
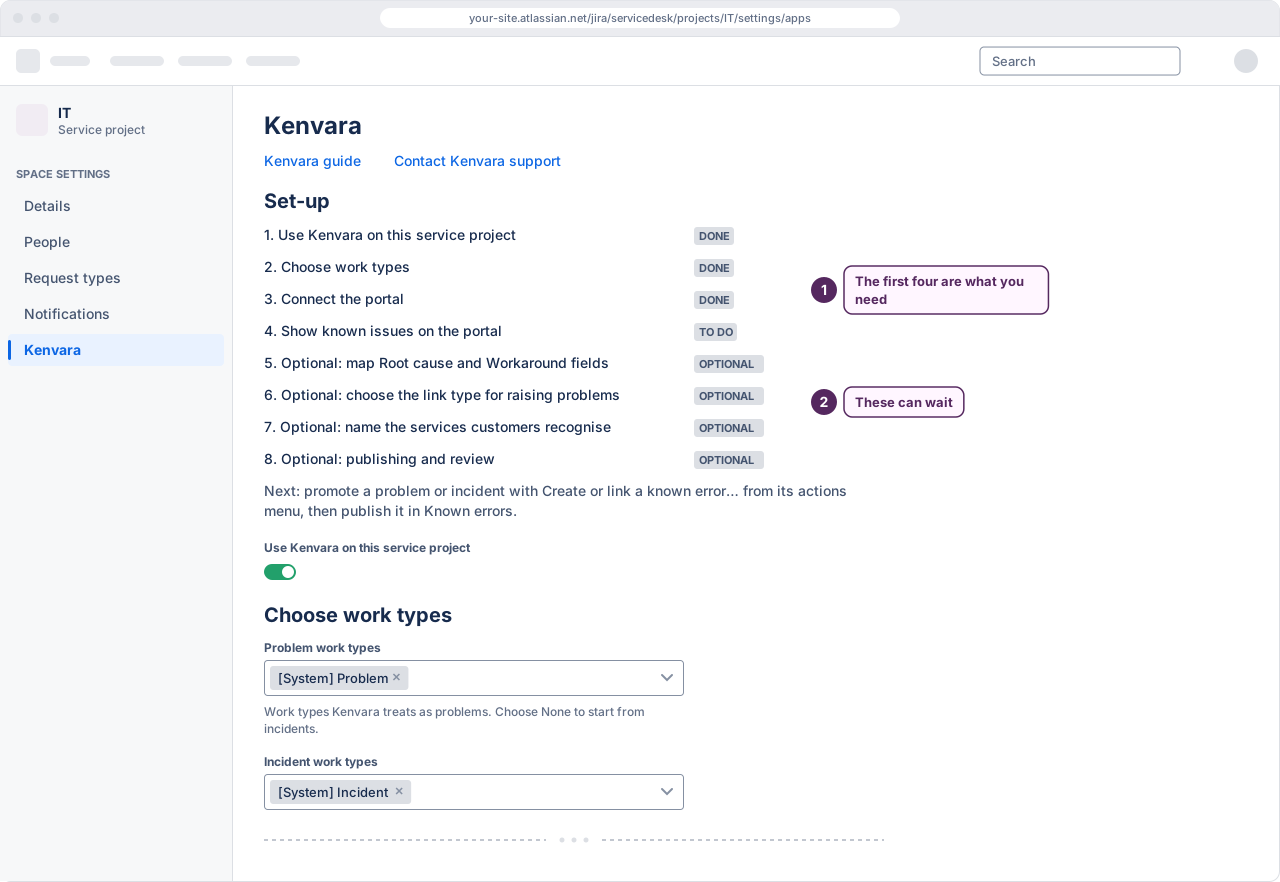
Open the service project, then the Kenvara page of Space settings (Jira’s name for what was Project settings). The page opens with a “Set-up” checklist, and the checklist is the order to work in. Each step shows whether it is done. The first four steps are what you need; the last four are marked “Optional” and can wait.
 (opens the full-size illustration)
Switches, lists and fields on the page are saved together, by “Save settings” at the foot of the page. Nothing changes until you select it; then “Settings saved.” appears. Connecting the portal and turning portal surfaces on, below, save from their own dialogs.
1. Use Kenvara on this service project
Turn on “Use Kenvara on this service project” and select “Save settings”. Each service project is off until its own administrator turns it on, and turning it on shows nothing to customers.
2. Choose work types
The page has two lists, “Problem work types” and “Incident work types”. On a new service project Kenvara suggests the work types named Problem and Incident; nothing is saved until you select “Save settings”. Check which of the project’s work types count as problems and which count as incidents, then save. A work type cannot be in both lists. The Known errors panel and “Create or link a known error…” appear only on work items of the types you choose.
A service project created since January 2025 may have no problem work type at all. To start from incidents, choose “None: start from incidents” in “Problem work types”: known errors can then be written from incidents. The lists offer only the project’s own work types, and Kenvara never creates one.
Add a problem work type. In Jira, a Jira administrator adds a work type to the project’s work type scheme; it then appears in “Problem work types”.
3. Connect the portal
Kenvara needs to know which customer portal belongs to this service project before it shows
anything on it. Paste the address customers open for this service project’s portal, which
contains /portal/ followed by a number, and select “Check this portal”. A confirmation names the portal and the service project; check both, then select
“Connect this portal”.
No portal surface can be turned on until the portal is connected.
4. Show known issues on the portal
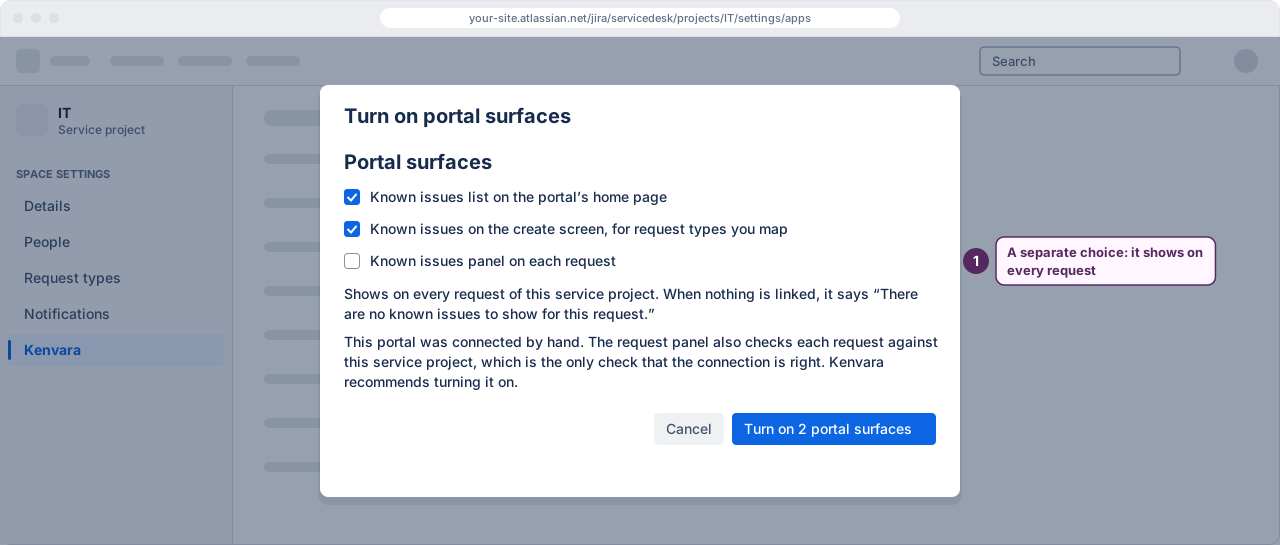
Select “Turn on portal surfaces”. There are three surfaces, each with its own checkbox:
- Known issues list on the portal’s home page, ticked;
- Known issues on the create screen, for request types you map, ticked;
- Known issues panel on each request, not ticked.
The request panel is a separate choice because it shows on every request of the service project, and says “There are no known issues to show for this request.” when nothing is linked. It is worth turning on when you connected the portal by hand, as in step 3: the panel also checks each request against this service project, and that is the only check that the connection is right.
Select “Turn on 2 portal surfaces”, or 3 if you ticked the panel. Turning surfaces on still shows customers nothing until a known error is published.
 (opens the full-size illustration)
Write the first known error
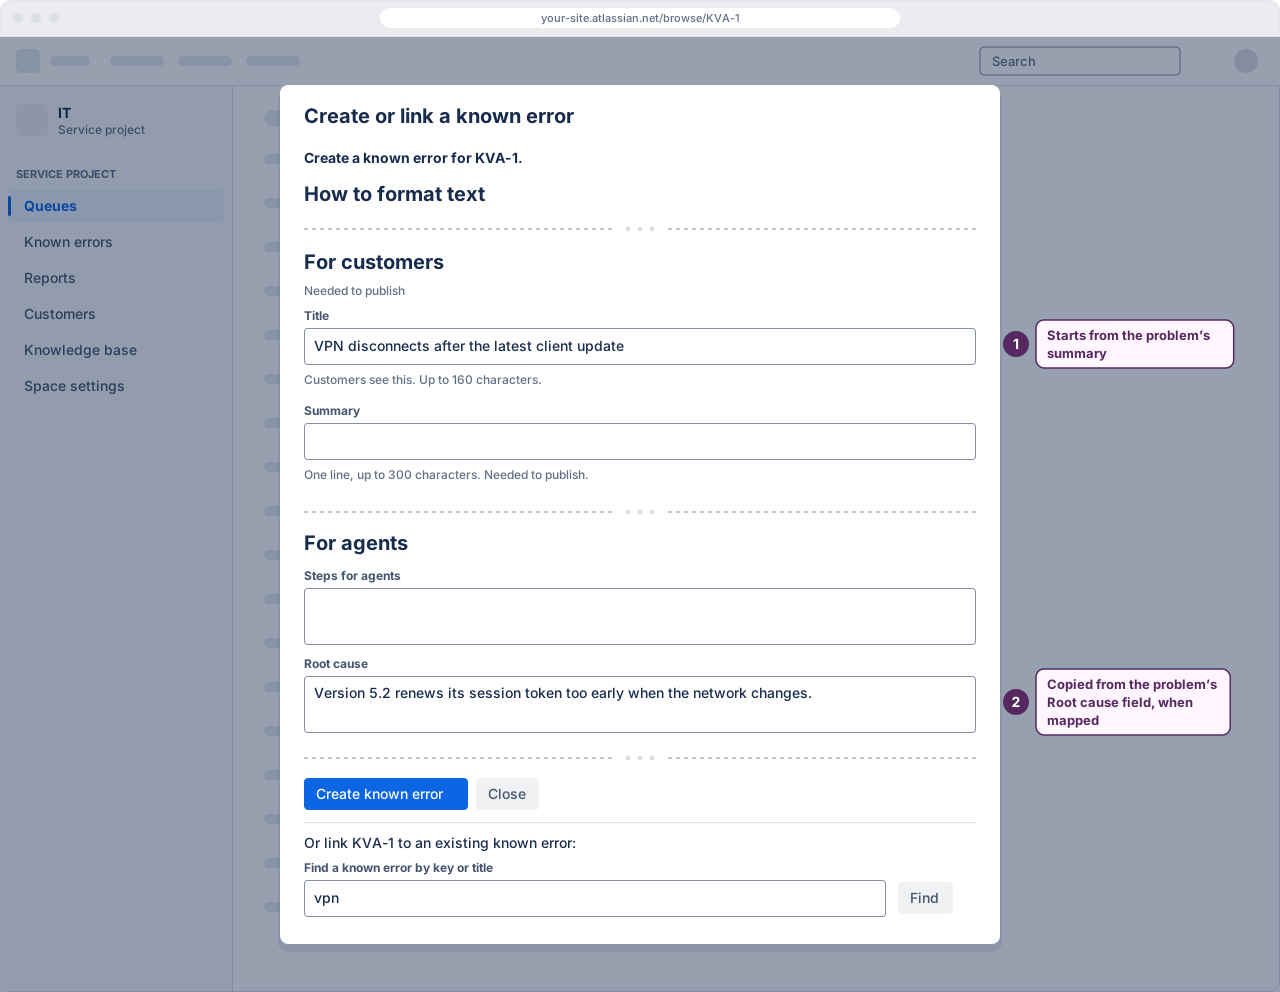
Open a problem that has been analysed and, from its actions menu, choose “Create or link a known error…”. You can also start from the Known errors page in the service project’s queues, with “Create a known error”. Fill in what a customer needs: the symptoms, a workaround and whether it is temporary or permanent, and a short message written for customers rather than for agents.
 (opens the full-size illustration)
The record starts as a candidate. A candidate is internal: it is not on the portal, whatever the surfaces say.
Map request types
The create screen shows a known issue only for the request types it is mapped to, directly or through a service. Open the record in Known errors, choose its Matching tab, choose the request types whose create screen should show it, or a service, and save. A service covers the request types a project administrator chose for it under Services on the Kenvara page of Space settings. Without a request type or a service, the create screen shows nothing for it.
Publish it
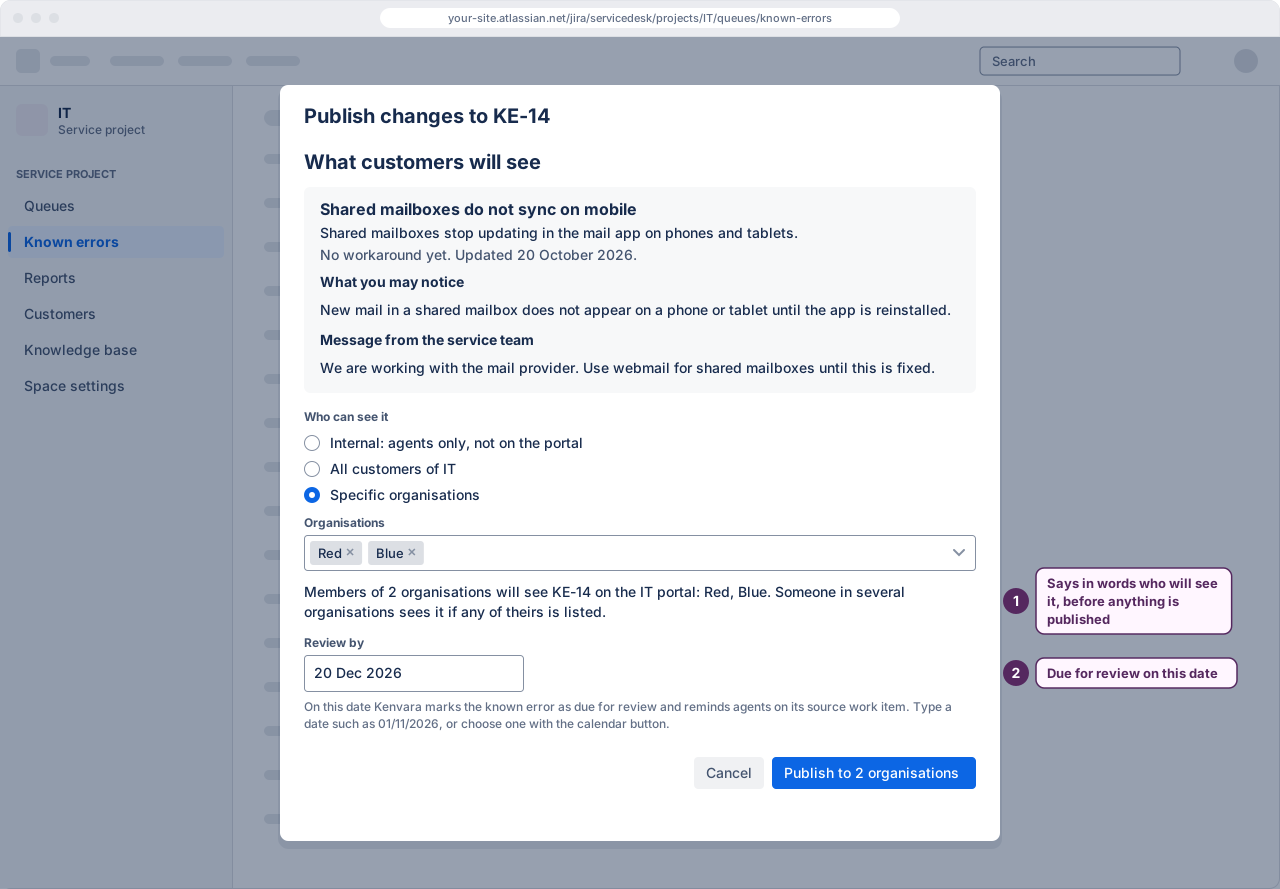
Publishing is its own step. It needs a project administrator, or a member of the publisher role chosen under “Who can publish” in the Kenvara page of Space settings. Choose the audience:
-
Internal keeps it inside the team.
-
All customers shows it to everyone who can see this project’s portal.
-
Specific organisations names the customer organisations that may see it, and only their members see it. That has been observed for customers who use the portal with a portal-only account, and Atlassian’s platform checks have passed for customers who sign in with an Atlassian account. Those who sign in with an Atlassian account are scoped by organisation only once Kenvara’s daily check of the site’s organisations covers three or more and is current; until then, and for anyone who belongs to more than half of the site’s organisations, or to one created since the last check, they see only known issues published to all customers.
The check first runs the day after the first known issue is published to specific organisations, and again every day while one is; a check more than two days old no longer counts. The Kenvara page in Apps administration shows whether it is current, on its “Organisation census” line, and whether Atlassian-account customers are shown organisation-scoped known issues, and if not, why.
Then choose a “Review by” date, from today on, and publish. “All customers” is the simplest audience for a first run.
 (opens the full-size illustration)
Check what customers see
On the Known errors workbench, select “Preview as organisation” and choose an organisation. The preview shows the known issues that organisation’s members see on this portal, and records nothing. Members who sign in with an Atlassian account see that only while their organisation scoping is working; when it is not, they see only known issues published to all customers, and the preview says so.
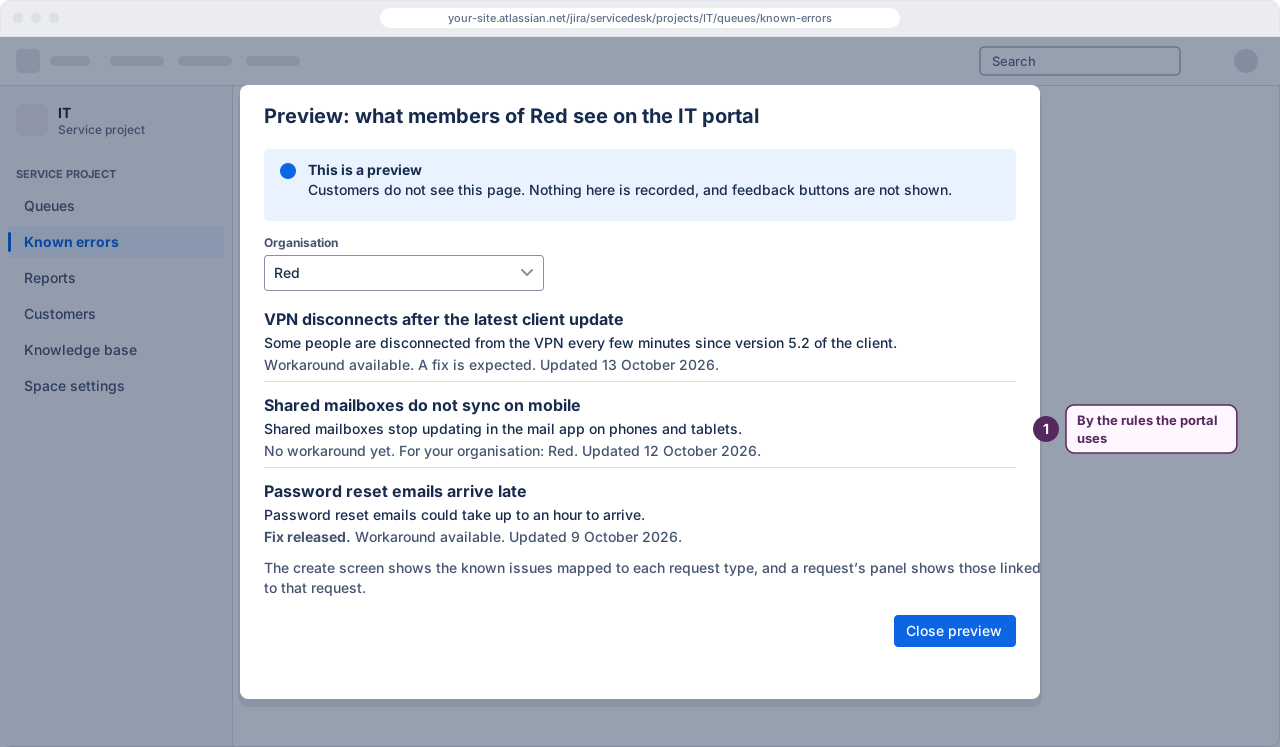 (opens the full-size illustration)
Then look at the portal as a customer would, not as an agent: the known-issues list on the portal’s home page, the create screen of a request type you mapped, and, if you turned it on, the panel on a request the known error is linked to.
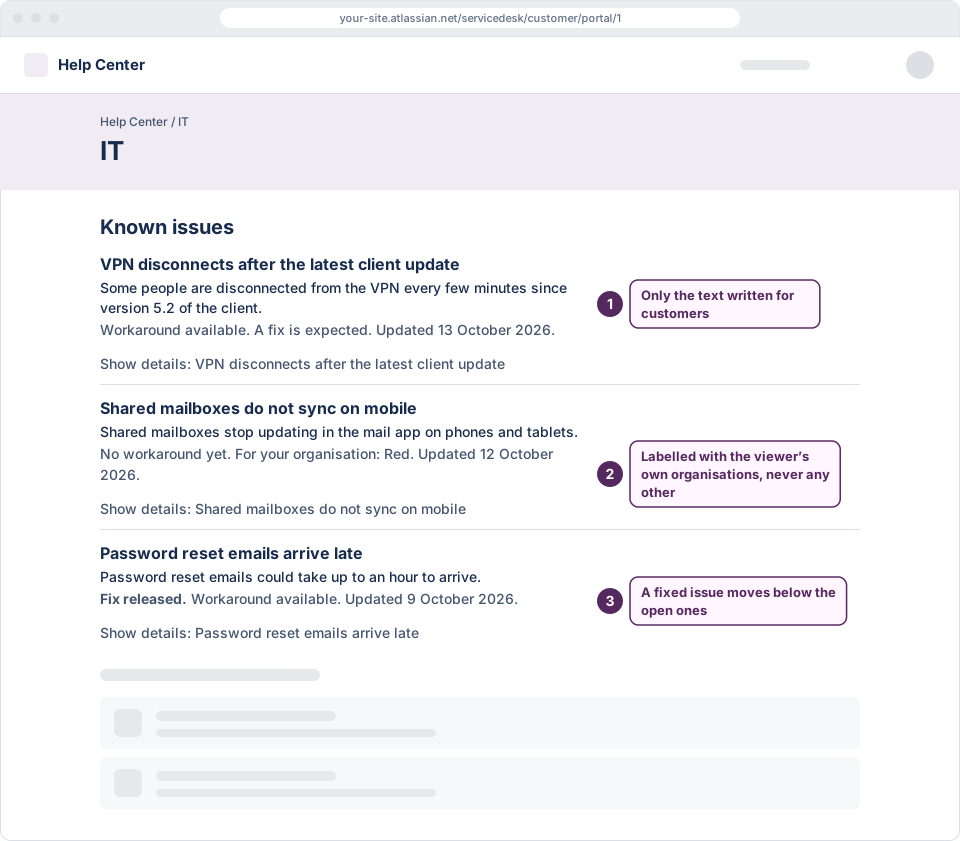 (opens the full-size illustration)
When the evaluation ends
If the site has subscribed, nothing changes. If not, Kenvara becomes read-only, with export: customers see nothing from Kenvara on the portal, agents can read known errors but not create, edit, link, publish or import them, changes that only switch something off still save, and a Jira administrator can still export. The Kenvara page in Apps administration says so, and shows a reminder in the evaluation’s last 7 days.
What to do next
- Backup and migration, which you should set up before you rely on the app.